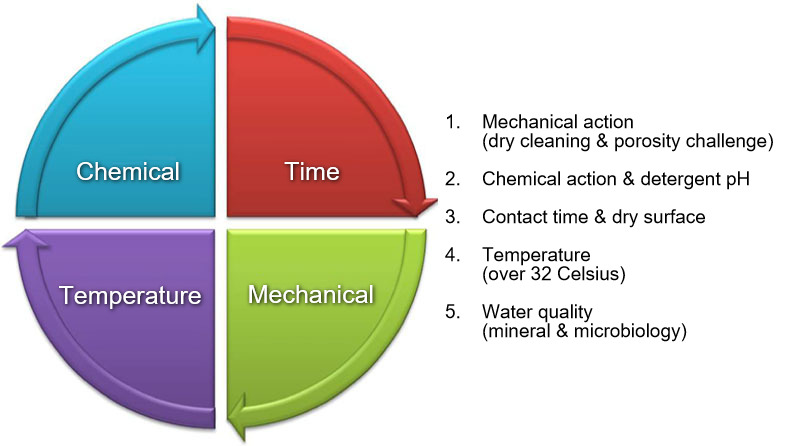
The most common mistake with swine transport hygiene SOPs (Standard Operating Procedures) is related to the strong belief and almost solitary focus within decontamination processes that the use of disinfectant alone can decontaminate the residual organic matter potentially remaining after poor cleaning. The second mistake is a lack of consistency in the execution of protocols due to a gap in either communication or in training due to a poor or inconsistent systematic process of re-training and reviewing these SOPs with the people in charge of their execution. Let’s review the different steps that need to be included when building a solid SOP for this hygiene process, based on the Hebbert Sinner’s Circle principles for cleaning and disinfection (Image 1).

First step:
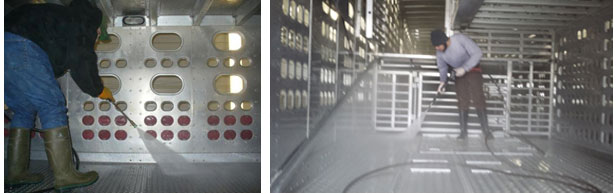
Dry cleaning (i.e. scraping out) aims at removing the bulk of visual organic matter and minimizing the aerosolization of contaminants (Image 2). Avoid any attempt to prematurely start the next protocol step that uses water pressure in order to replace the mechanical action of dry cleaning. Doing so would result in the atomization of organic matter and its contaminants, making it more difficult to reduce and eliminate.

Second step:
Wet cleaning should be performed with the use of clean, pressurized water to complete the removal of fine particles and organic matter that remains after dry cleaning (Image 3). To improve this step, use hot pressurized water (around 32 Celsius). Without the appropriate level of moisture on the surfaces, one cannot obtain the greatest effectiveness of the wetting agents found in the detergent formulation and the surfactant agents will not achieve maximum effect in synergy with the hot water temperature.
Third step:
The application of the detergent (Image 4). The surface has been prepped for the action of the detergent that will refine and optimize the removal of biofilms, organic matter and scale, removing the accumulation of organic deposits and mineral films. This work should be carried out according to the product’s pH. In the case of neutral detergents, this depends on sanitizer component of the chemical. Low pH detergents have been formulated to effectively address mineral-based scale and biofilm while alkaline detergents tend to address the organic matter. A third important characteristic of detergents is related to tolerance to some level of hard water conditions.
Hot water can contribute synergistically to improving the surfactant capacity of detergent components, thus not only facilitating more efficient and rapid rupture of the surface tension of the components but speeding up the more even removal of organic matter and biofilm.
An appropriate pressure setting for the equipment and the type of nozzle tip are key for the quality and uniformity of the foaming. Foaming is fundamental on vertical surfaces to improve the retention time of the surface and achieve the ideal contact time of the detergent.

Fourth step:
Rinse and remove the detergent. We must make sure that the surfaces of the trucks do not dry with the detergent still on them, since detergent makes it more difficult to remove biofilms and inlays. The detergent must have a 15 to 20 minute contact time, according to the manufacturer's recommendations, but then it is critical to rinse and remove the detergent and allow the surface to dry. Any pooled water present will affect the dilution of the disinfectant.
Fifth step:
Disinfection. The hard work of cleaning has been done and with it at least 90% of the organic matter has been removed, and the job is 90% complete. Disinfection is important, but it is only the final chapter of the entire hygiene process. The foaming characteristics and capacity of certain products could help improve the contact time on vertical surfaces, when delivering the product with the appropriate equipment. Disinfectant products can achieve maximum effectiveness when they are applied over a dry surface, using the correct dilution, an acceptable hardness of water in terms of mineral content, and the best possible coverage over the critical surfaces that had been contaminated by animal organic matter. The process should allow the disinfectant to obtain the indicated contact time, and the trailers should be dry before leaving the trailer/truck wash unit and before being exposed to weather elements.
Keep in mind that for proper disinfection of all surfaces, the last step should utilize a mechanical drying step such as thermo-assisted drying and decontamination (TADD) with the air-dry room at about 50 to 72 Celsius for 10 to 20 minutes, pathogen dependent. Another thermal surface decontamination system is offered by the DRYSIST technology. This system electronically verifies the treatment of all interior surfaces of the truck at 70 Celsius for 30 min from when the coldest section of the truck reaches the desired temperature.
If bedding material is to be used for a certain group of animals, a specific SOP must be developed and written for purchasing biologically safe material (incoming quality control – IQC) and for the storage and bio-secure handling within the trailer wash unit facility, before the material is put into the already clean and disinfected trailer.
Some additional critical points to have in mind when writing SOPs for these hygiene protocols are the following, related to the washbay and the washing process.
In the vehicle wash bay:
- To enable and facilitate the drying process, one should consider inclining the floor of the wash bay to improve the timing and quality of the process (eliminating pooled water). Other potential tools/processes for improving drying optimization are squeegees to mechanically remove the water.
- Wash the entire bottom of the truck (the undercarriage) with a rotary machine.
- Remove garbage from the cab of the truck (dry cleaning).
- Remove all components that do not belong to the cabin of the truck.
- Designate two distinctive colors for the uniform to be worn for washing and a different one for disinfection.
- Put on rubber boots and a protective suit for washing.
- Place empty sawdust bags, dirty rubber boots, overalls, and gloves in their designated places (recycling bin, trash, or laundry).
- Position the brooms, shovels, paddles, movement tables, etc. for washing.
During the washing process:
- If the trailer remains with the truck cabin, clean the truck cabin first and then close the doors while washing the trailer and other equipment. Another option is to perform only dry and wet cleaning and close the cabin to leave its disinfection until the end of the entire process. Ideally, separate the truck cabin from the trailer and clean it separately so that the truck does not come into contact with the organic matter resulting from the washing of the trailer.
- Whenever possible, clean the truck cabin using compressed air for the seats, and water for the floor and the pedals.
- Wash and clean the pedals and the floor of the cabin.
- Clean other cabin surfaces (steering wheel, lever, door handles, dashboard, shifter, etc.) with a clean cloth that is moistened with a disinfectant solution, or with disinfectant wipes.
- Apply a pyrethrin insecticide inside the cabin to kill any insects and close the cabin doors.
- Working from top to bottom, and from front to back, first wash the outside of the trailer and the truck under pressure or high flow, and then the interior of the trailer, including ramps, doors, panels, brooms, shovels, clean and dirty boxes, and both sides of the panels